Career
Custom SOC Homelab
Project URL: https://blog.ecapuano.com/p/so-you-want-to-be-a-soc-analyst-intro?utm_source=direct&utm_campaign=post&utm_medium=web
Intro:
Welcome to my custom SOC Homelab. I want to begin this project description by detailing that I created this SOC environment specifically for learning purposes. I wanted to try my best to understand what it is like being a SOC analyst and emulating the experience of one. The reason for this is to bridge the gap for me to gain experience in the job without actually having a SOC analyst role in an organization. With that being said, I wasn't sure where to begin or how to complete the project so instead I found a guided project that pointed me in the right direction. I included the guided project I used at the top of this page. My documentation of the project includes five relatively basic steps. I did not dive into every single detail of each step because that is what the guided project is for, my focus was to discuss the important steps I took in the process and also demonstrate the key aspects that I learned.Part 1: Set up a small virtualization environment
The first task I did was create the virtual environment. This environment will consist of an attacker and a victim. Each of these machines were created and used using VMware's 30-day free trial. The victim machine is a Windows host downloaded directly from Microsoft's developer page. A couple configurations were made including disabling Defender, preventing standby, installing Sysmon and installing LimaCharlie's EDR tool. After completing these steps this machine was ready to be spun up. The attacker machine is an Ubuntu server installed via an ISO image as another machine. Similar to the Windows machine, there were a couple configurations that needed to be made before it could be ready to go. Some of these configurations include setting up a static IP for the machine, enabling OpenSSH and downloading Sliver (a command and control (C2) framework from BishopFox). Once finished the machine is ready.Part 2: Put on the adversary hat, it's time to make (and observe) some noise
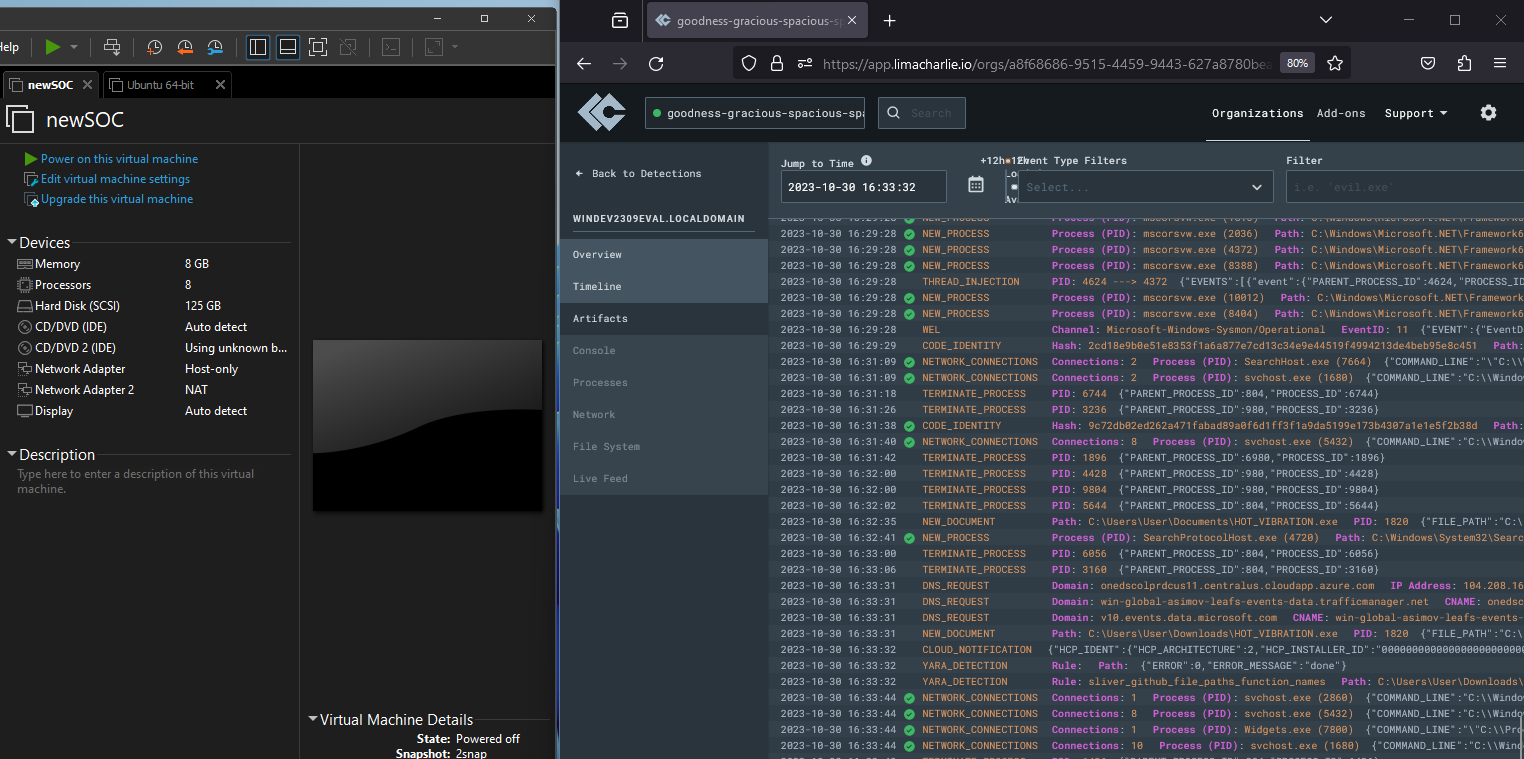
In this phase of the project, the Command and Control (C2) operations are explored. There are a couple of key steps that were taken. First, the C2 payload was generated. By jumping into an SSH session of the Ubuntu machine a series of actions were done to create the C2 payload using Sliver. Next, to transfer the payload from the Ubuntu attacker machine to the Windows victim machine a Python trick was used. A temporary web server was spun up to download the payload onto the Windows machine from the Ubuntu machine which enabled the ability to execute the malware on the victim machine via an administrative PowerShell session. After this with the C2 payload successfully on the victim Windows VM, I returned to the Ubuntu attacker VM SSH session to enable the Sliver HTTP server. This allowed the session information to be recorded from the Windows VM. After that, the Sliver server was explored to verify the session taking note of the Session ID. At this point, I was directly interacting with the C2 session on the Windows VM, running basic commands to gain insight into the victim host. This involves checking information about the session, user privileges, the working directory, network connections, and running processes on the remote system. Finally, I moved into the LimaCharlie web UI to explore EDR telemetry, specifically focusing on processes, network activity, and the file system on the Windows VM. This insight is invaluable for identifying normal and abnormal activity on the system.Part 3: Emulating an adversary for crafting detections
In the third part of this project, I returned to the Sliver C2 session to perform activities that simulate adversarial actions, such as accessing sensitive processes like "lsass.exe" to steal credentials. Also working on detecting these activities using LimaCharlie. Before proceeding with adversarial actions, an essential part of being an attacker is to check the privileges of the C2 session on the victim system. One specific privilege to confirm is the "SeDebugPrivilege," which grants elevated rights, enabling various actions like memory access. The lsass.exe process is a critical component of Windows that stores sensitive security data, including user credentials. Dumping this process from memory is a common technique used by adversaries to steal credentials and escalate privileges. The "procdump" command is used to perform this action and save the dump locally on the Sliver C2 server. The generated dump file, typically "lsass.dmp," can be further analyzed for more information. After performing the adversarial action, I moved to LimaCharlie to detect it. To detect the act of accessing sensitive processes like "lsass.exe," I create a detection rule in LimaCharlie. The rule focuses on the "SENSITIVE_PROCESS_ACCESS" event type, which is triggered when critical processes are accessed. The rule definition specifies that it should match events where the victim or target process ends with "lsass.exe." Once the detection rule is created, it's essential to test its effectiveness. LimaCharilie provides a feature to test the rule against the event that was observed during the adversarial action. This testing ensures that LimaCharlie correctly identifies and responds to the specific suspicious activity. With the detection rule in place, I repeated the same adversarial action, in this case, running "procdump" on "lsass.exe." After repeating the action, I go to the "Detections" tab in LimaCharlie's interface to check if the rule I created has detected the threat. If a detection occurs, it provides insights into potentially malicious activities and prompts a response.Part 4: Blocking an attack
This portion of the project focuses on blocking attacks and involves several key steps.
The fourth stage starts by introducing the concept of blocking attacks, going beyond just generating alerts when threats are detected. The idea is to take proactive measures to prevent or disrupt malicious actions.
Before implementing blocking rules, it's essential to baseline the environment for false positives. Baseline creation involves crafting alert-only detection rules and allowing them to run for days, weeks, or even indefinitely to eliminate false positives. Proper baselining is crucial to avoid causing issues in the production environment.
The third step in this stage focuses on a specific type of threat behavior: ransomware. Ransomware in some cases targets and deletes Volume Shadow Copies, which can be used for system restoration. This behavior is predictable and can be used as a basis for creating a blocking rule.
When crafting the blocking rule a sample command associated with deleting Volume Shadow Copies, "vssadmin delete shadows /all" is shown. This command is typically not run in healthy environments.
The rule is then tested to determine whether it can effectively detect and block the action. The steps include running the command, reviewing LimaCharlie's detection tab, and examining the detection's metadata.
From the detected event, a D&R rule is crafted. This rule is designed to initiate a response action when the activity is observed. The response action includes generating a detection report and terminating the parent process associated with the "vssadmin delete shadows /all" command.
With the D&R rule in place, we want to rerun the command to delete Volume Shadow Copies. The blocking rule should terminate the parent process, effectively blocking the action. The effectiveness of the rule is tested by running the "whoami" command to check if the system shell is still active on the attacker machine.
It is important to note that the rule can be further refined to account for variations in the command and make it more robust. It is suggested to use more intelligent ways of matching specific commands line arguments, such as using the "contains" operator.
Part 5: Trigger YARA scans with a detection rule
In this part of the project, the focus was on automating YARA scanning using an EDR sensor, specifically in the context of detecting and classifying malware. The section begins by introducing YARA, a tool used to identify and classify malware based on patterns. It explains its significance in the field of cybersecurity, emphasizing its flexibility and the active community supporting it. YARA rules for detecting the Sliver C2 payload are added to the LimaCharlie instance. The UK National Cyber Security Centre's YARA signatures for Sliver are used. Two YARA rules are created: one for files and one for processes. To generate alerts for YARA detections, two D&R rules are created. One is for YARA detections not involving a PROCESS object, and the other is for YARA detections specifically involving a PROCESS object. These rules facilitate alerting and further actions upon YARA detections. A manual test is conducted by initiating a YARA scan using the EDR sensor. The Sliver payload is scanned to ensure that the YARA signature functions correctly. This test confirms that all the components are working up to this point. After that, two D&R rules are created to automate YARA scanning for new .exe files in the user's Downloads directory. When a new .exe file is created, these rules generate alerts and trigger YARA scans using the Sliver signature. Two additional D&R rules are created for scanning processes launched from the Downloads directory. These rules aim to identify processes associated with the Sliver C2 payload and initiate YARA scans. The specific Sliver-process YARA rule is used for this purpose. The newly created rules are tested. The test includes simulating the movement of the Sliver payload between directories and launching it to generate the necessary events. The system's Detections tab is monitored to verify that the automation effectively triggers YARA scans and generates alerts for any malicious activity.Key Aspects Learned from each section:
Part 1:
This project was a comprehensive journey through the intricacies of setting up a secure virtual environment, fine-tuning it for cybersecurity experimentation, and integrating powerful tools to enhance security monitoring and incident response capabilities.Part 2:
The ability to differentiate between regular system noise and potential threats is a vital skill for any analyst. This segment has laid the groundwork for honing that skill and familiarizing myself with the abundant telemetry generated by the "idle" Windows VM. The journey through LimaCharlie's EDR tool provides rich insights both informative and crucial for any analyst.Part 3:
This section demonstrates how offensive actions can be simulated for the purpose of testing detection and response mechanisms, enhancing security, and gaining a better understanding of security operations, especially when using a tool like LimaCharlie. This project helps future security professionals (such as myself) fine-tune their systems to detect and respond to real-world threats effectively.Part 4:
This part of the project emphasizes the importance of creating blocking rules that go beyond detection to actively disrupt and prevent threats. It also highlights the need for proper baseline settings to minimize false positives and provides a practical example using ransomware behavior as a case study for blocking rules.Part 5:
The last section of the project focuses on leveraging YARA rules and an EDR sensor to automate the detection and response to potential malware threats, specifically targeting the Sliver C2 payload.Conclusion:
If you have made it this far I just want to say thank you for taking your time to read this. My journey to becoming a security professional is becoming clearer every day. If I make any updates or additions to this project this documentation will be updated. Once again thank you for stopping by.